Tuesday, December 21, 2010

Christmas 2010...

Just as I took a break from posting house-related things to post sewing-related things, I'm taking a break from sewing-related things and going back to house-related things for a minute.

If you read one of my other blogs, Our World = Rocked, then you know that I've had our baby.  Deacon Josiah was born October 26, 2010, so we've had him for 8 weeks already!  Hard to believe.  Since he's been here, I've come to a screeching halt on the sewing thing.  I plan to get back to it at some point but it's not real high on the priority list right now.  :)

That being the case, I thought I'd post photos of what Christmas looks like at our house this year --


This year will be very different for us since we have our little one.  My mom & dad are exorbitantly excited to have another grandchild to lavish love on this Christmas.  It's been 6 weeks since they've seen Deacon, so they are ready for Christmas to get here already so they can get their hands on him.  :)  My brother, sister-in-law, niece and grandparents have yet to meet him and Christmas will finally allow that meeting so that will be an exciting time in the life of our family, too.

I hope you all have a very merry Christmas and a blessed-beyond-measure new year!

Saturday, October 2, 2010

Home EC Class: Project 15

Pillow Case with Piping

**You will notice that I've skipped a few more projects -- 12 & 13 were some type of clothing and as I said in my last post, I will not be attempting anything like that until after this baby arrives.  Project 14 was for a "plushie toy" and while that IS something I could do right now, I've not come across a pattern, etc. of something I'd like to make for Deacon yet.  Hopefully, I'll find something soon and be able to get that project done before he gets here.**

Lessons learned:
   adding piping to a pillow
 *adding straps to a pillow with piping


my straps...kinda proud of these :)

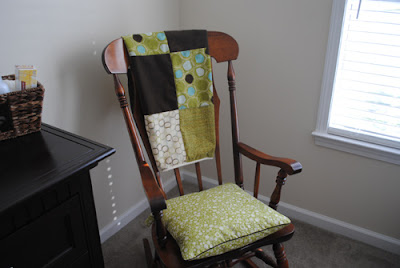
the rocking chair for which I made the pillow/cushion

see how well the fabric on the pillow matches the nursery decor?

I made this pillow case with piping with the idea of making it into a seat cushion for the rocking chair we have in the baby's room.  The beautiful chair is the one that my parents had in MY room when I was little.

*Since I didn't want the cushion to slide out every time we sat in the chair, I had to figure out how to add straps since that wasn't part of the tutorial.  I was pretty pleased with how they came out.  And how simple that idea was to incorporate.

I couldn't be happier with this project -- it was easier than I thought it would be considering we used piping, and the end result is just perfect!

Sunday, September 12, 2010

Home EC Class: Project 11

Zippered Pencil Case

**If you noticed that I skipped project 10, I commend you on your keen observation!  :)  Project 10 was for hemming jeans and while I'm still in the present state of pregnancy (not to mention 7 weeks away from delivery!), I will be avoiding those projects that have anything to do with clothing until after the baby comes.  UPDATE: posted here.  **

Lessons learned:
   installing a zipper
   lining a pouch

closed...

open...


I was really looking forward to this project -- I think knowing how to sew in a zipper will come in quite handy.  I enjoyed this project, though, I did get a little frustrated about how my particular pouch wasn't quite so square (or rectangular, in this case) when I got finished, and also in trying to sew the other side of the zipper (with the particular instructions we were given), but everything turned out relatively okay in the end.

I think the old saying, "Practice makes perfect." will apply tremendously here.  :)

Thursday, September 9, 2010

Home EC Class: Project 9

Reversible Bib

Lessons learned:
   piecing fabric
   using (or making) a template
   using double fold bias tape to finish edges

the front...

the back...

You would think that I'd be really excited about this project for the simple fact that I'm going to have a baby in 2 months, right?  Well, I was.  Until I got into it.

This project has actually turned out to be my least favorite so far.  Hard to believe I know, but there are several different reasons why that is:

1) I made my own template from a bib we already had in our baby's closet and though that wasn't so bad, I think it may have turned out a little small (and I know he IS going to start out pretty small, but I'm just sayin'.)

2) I made the straps too short -- they're supposed to be long enough to tie in a bow behind the baby's head.  As it is, I'm going to have to put some velcro on the very ends of the straps and even THAT may cause minor suffocation after a time.

3) The quilting didn't turn out near as well on this project as it did on the potholders.  Not sure if it's the fact that I used felt instead of batting for the padding, that I had striped material that wasn't all that even, that it wasn't a square piece of fabric that I was sewing on or that I sewed my quilting lines a little closer together this go-round so there were more of them, but whatever it was had me rushing through just to be DONE with this project.

4) The bias tape didn't go around my bib quite as smoothly has I thought it would or should and I don't know if that was because my bib was more squared than the bib in the instructions but I did my best with it.  It doesn't look too bad in the photos, but there a couple of quirky places if you look closely.

I really don't want to finish this post on a negative note so I will say that, though I'm glad to be past this project and not sure I'll attempt another bib, I did learn how to piece fabrics together and that wasn't too bad and also, even if the bib turns out too small for him, I can always turn it into a sign to hang on his doorknob or something.

Sunday, September 5, 2010

Home EC Class: Project 8

Curtains (Grommeted)

Lessons learned:
   lining up a pattern
   double hemming
   spacing & installing large grommets

one panel, for our kitchen window...


I am SO EXCITED about how this project came out!  The grommets were so easy to put in (just snap in place after cutting out the circle -- no tools required).  I sewed just one long panel (instead of 2 like the instructions suggested) just because I was only doing a valance and I saw no reason to do 2 panels.  And I.am.in.love. with this fabric that I picked up at Hancock Fabrics!  It's a little pricey (but I did purchase it at 40% off :) but matches my dishes perfectly and I'm so pleased with how it looks.  It surprises me every time I walk into the kitchen.  In a fabulous way.  :)

I have a patio door to the right of these photos that I'm already calculating yardage for...

Saturday, September 4, 2010

Home EC Class: Project 7

Quilted Potholders

Lessons learned:
   batting
   closing in a double-sided square
   blanket stitch


The tutorial for this project only instructed us to sew the parallel lines (shown on the printed side), called "quilting", I think.  And that was okay.  However, I saw another classmated do the square "spiral" design on theirs (in the collection of flickr photos we have access to) and I thought it was pretty neat-looking so I decided to give it a try on my 2nd one.

I like the look of the parallel lines and it was easier than I thought it would be to get them relatively straight but my beginning and ending w/backstitching turned out kind of messy (you can kind of see that in the 2nd photo above).  But I really like how the spiral turned out and it was much faster than the parallel lines because I didn't have to remove my needle until I got to the center/end.  The only thing that didn't turn out was that when I got to the center, on the backside (the printed side of that one)...oh, my stitching was horrendous.  I'm wondering if it was because the batting inside was just really thick there at the end.  Not sure, but I've decided to just use the orange side of that one, and the printed side of the other one.  :)

These potholders match the napkins that I made for Project 1 and just on a side note, we had dinner guests last night and I busted out my napkins for them.  First time in use -- I was so proud!  :)

Tuesday, August 31, 2010

Home EC Class: Project 6

Ironing Board Cover

Lessons learned:
   using old cover (or board) to create a cover for the new
   edge-finishing options
   elasticizing an edge
   calculating fabric required


close-up of my fabric...love it!  :)

This project came at just the right time.  Some of you know that my husband and I are getting ready for a baby due the end of October so we're having to change what used to be the guest room into what will be the nursery, and in the process, keep the full-size bed that was in the guest room so we'll still have a place to house guests who come to visit (the baby or the beach.  Or both. :).

To do that, my handy husband is building a murphy bed to encase the bed which will go in our other bedroom which is currently known as the "craft/computer/catchall room".  But not only is he building the murphy bed cabinet itself, he's adding shelving, etc. on either side to create a "wall" structure.  It's absolutely amazing (and nearly done, hooray!).  Anyway, one of the features he's building is a fold-out ironing board for me.

I have a full size ironing board right now that we store in the laundry room.  I hate ironing in the first place and it's so difficult to get out.  And it has this really ugly gray cover on it.  :)  This new fold-out ironing board will be so nice because it will be easily accessible and it has a beautiful, though not perfect, cover on it!  That I made!

I chose this fabric because it matches some other countertops in the room itself and when everything is complete, I'll post photos of it all and you can see for yourself.  I'm so excited about how this is all turning out.  :)

The cover was a good challenge -- we took the board that Jeff built and laid it on some thin kraft paper to make the pattern.  We went out about 3 inches from the board itself to allow for overhang, etc. and drew around and then cut it out.  Voila -- my first pattern!  :) Then I pinned the pattern to my fabric and cut.

As I said, the cover isn't perfect and I do need ironing board clips (like everyone else in the class has said) to create a more tight effect, but it's functional for now.  I'm pleased with how it turned out.

Saturday, August 28, 2010

Home EC Class: Project 5

Supplies Roll-up

Lessons learned:
   creating sections (albeit uneven :)
   working with thicker material and heavier needle
   installing an adjustable strap

open with the flap closed...

open with the flap open...

open & filled with my sewing supplies...

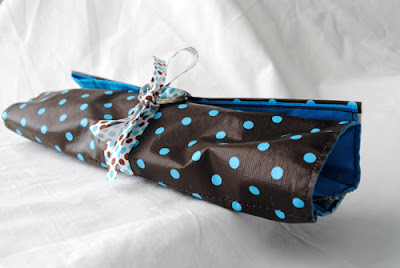
closed (rolled) up...

closer detail of the ribbon closure...

It's cute, right?

I made a few modifications to this project:

1) I couldn't get my hands on oilcloth specifically (which is what the project called for though they said we could use a few other materials) without ordering some and I wasn't patient enough to wait for it so my (wonderful) husband picked up some vinyl for me at Hancock Fabrics.  It worked just fine.

2) I couldn't find O-rings very easily so I chose some (too large) D-rings that worked.

3) I didn't have any matching ribbon that was 1" thick but I had this really cute ribbon "that matched and everything" so I decided to use 2 strands of it.  THAT was a challenge.

As was sewing the straight lines to form the sections inside.

Monday, August 23, 2010

Home EC Class: Project 4

Round Bunting

Lessons learned:
   creating fabric circles
   machine applique


my sewing area...

This project took a really long time but I'm so happy with the way it turned out!  The circles aren't perfect by any means, but I think for my first time ever doing something like this, I did good.  :)

I used the font "Impact" and typed it out in the appropriate sizes (I made the "t" a bit smaller than the other letters) using Photoshop 7.  I printed them, cut them out and traced them backwards onto my felt to cut out.

I did use individual ribbon strips in between the circles since I didn't have enough ribbon to use continuously.  I was worried about the drape of the letters, even as I sewed everything* together but it seemed to work out fine.

*The tutorial said that if you were using individual ribbon strips, that you should sew your circles and then hand-sew your ribbon to the back (meaning that that would be seen if you hung it where both sides could be seen).  Well, we all know how I feel about that hand-sewing business, so I just pinned them into place and sewed everything together so the ribbon strips are sandwiched in between the felt backing and the fabric, just as if it were a continuous piece of ribbon. 

Sunday, August 22, 2010

Home EC Class: Project 3

Reusable Grocery (Tote) Bag

Lessons learned:
   making a larger bag
   straps
   strong "x-joint"
   corner technique

I used an old pillowcase for this project...

a close-up of my x-joints...

I LOVE the x-joint technique! It's relatively easy and it looks really great.  I thought I might get this monogrammed with a fun color...

Saturday, August 21, 2010

Home EC Class: Project 2

Drawstring Gift Pouch

Lessons learned:
   making a bag
   joining 2 fabrics
   drawstring casing
   square corners
   strong slit
*the fact that I will probably NOT make another one of these in the same way again...

open (i.e. not tied up)...

closed (hypothetically w/gift inside)...


I have a couple of notes about this one:

The main fabric is hawaiian fabric that Jeff picked up for me on one of his business trips over there (so I've had it for awhile) so when I say "hawaiian", I mean authentic.  :) 

The top band is actually fabric from a bed skirt we have no need of anymore so I ripped out seams, squared it up and used it for this project.  I think the colors match perfectly.  :)

There was a part in this project that we had to hand-sew and if I learned nothing else from this project, it's that I'm not into that.  At all.  I did what I needed to but not without a few tears of frustration, some impatient outbursts and a vow to NEVER make one of these bags again.  Not unless I can make it without that hand-sewing business.

It's a good thing the fabric is cute.

Friday, August 20, 2010

Home EC Class: Project 1

Single & Double Layer Napkins

Lessons learned:
   squaring up fabric*
   simple hemming
   adding ric-rac

*it's questionable that I've learned this yet...

starting out...

my single layer napkins...

my double layer napkins...

really proud of these... :)

the double layer napkins on my kitchen table...


Friday, August 13, 2010

I'm sew excited!

Look what I'm participating in!


I discovered this class through another blog that I read (she's a sewer) and clicked on the link to see what it was all about.

I've been wanting to get into sewing for awhile now -- maybe the last 3 months or so.  I think that skill could come in pretty handy with all kinds of things.  So I sent Jeff the link to see what he thought of it and he was all for it, saying, "If you really want to get into sewing, this looks like an excellent opportunity."

My sentiments exactly.

So for $60 (+ my materials since it IS an online class), I registered to take this class and learn how to make 26 projects -- each project teaching a new technique and building on each other to take us "from beginner to confident"!

The class started this past Tuesday and while they post a new project each day on the blog, there are no deadlines and they will have the information up for a full year online so we can take it at our own pace.  Thank the Lord for that because it has crossed my mind a time or two that maybe I've stepped outside my mind to try to take this on at this very moment in my life.

With that being said, however, I couldn't WAIT for this class to get started!  Jeff got our sewing machine out last Thursday and set it up in my craft room on its own separate table with a lamp and everything.  Friday night, I didn't have any plans and the machine was calling me so I went online to just see what kind of simple projects with tutorials I could find.

I ended up sewing my very first thing that night!  A cute little drawstring bag made from a heavy green/brown/cream striped material (we had some material and other notions from when we got the machine in the first place) with a wide brown ribbon for the "drawstrings".  I can't even TELL you how tickled I was that I made it!  I just kept looking at it and giggling.  Jeff was proud of me, too.  

The next day, Saturday, I found a tutorial for a weighted pin cushion -- how convenient since everyone who sews needs a pincushion!  :)  So I made that, too, out of that same striped material plus some other green & yellow fabric & felt.  It came out pretty well, too.  So I had 2 projects under my belt already!

Well, as it turns out, I've not been able to even start the first project for this Home EC class due to other obligations each night this week.  But that all changes TONIGHT!  I'm going to sew tonight, if it's the last thing I do.  :)

Being the organized person that I am, I got a spiral notepad that I can use to keep track of things I learn, supplies I need, etc.  Being the crafty person that I am, I decorated the front of it.  :)


I am ready!  Bring on the fabric & thread!

Now you may be wondering why I would post this information (and any subsequent info/photos) on this blog and the MAIN reason is so that I don't have to start a FOURTH blog, hello.  But the other reason is because I think it can kind of be related to the home -- a lot of the things we're learning to make will be for our home so I plan to make them useful.

So you may or may not care about how it goes with this class, but this is where I'll be posting my progress for the class for awhile.  I know it's been QUITE a while since I've posted anything here and I'm thinking I'd probably be pretty lucky if I still had any readers who check this blog of mine, but whatev.

Okay, wish me luck!